By Stephen Angeloni PhD
Sr. Field Application Scientist
While a number of PCR based assays may be used for miRNA analysis, few are suitable for the economic analysis of large numbers of miRNAs in one reaction. Those that are capable of multiplexed analysis often lack the single base resolution needed to distinguish a number of miRNAs that differ by only one nucleotide base.
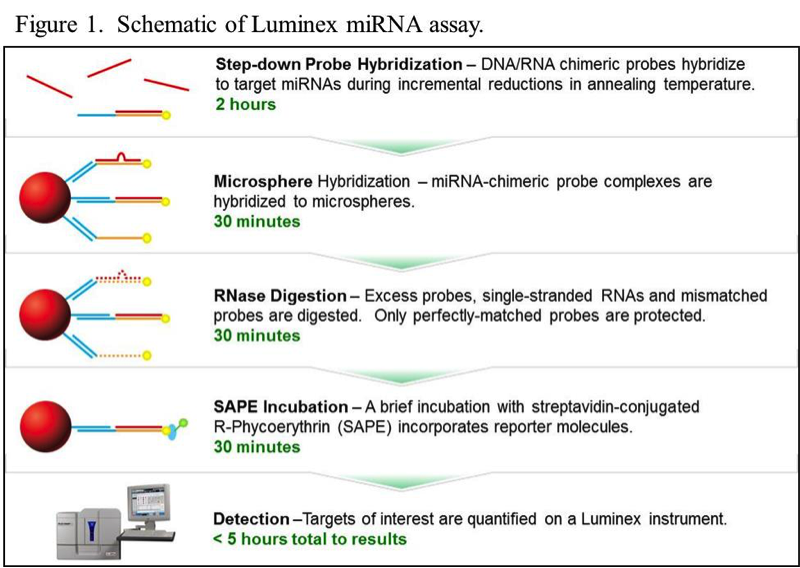
The nuclease protection chemistry employed in a Luminex®-based miRNA assay not only provides single base resolution, it is also a more flexible and cost-effective alternative to other platforms. Since no PCR amplification is involved, the assay can be completed in a few hours (Figure 1), and the required reagents and consumables are inexpensive and easily obtained. More details about the assay can be found in the xMAP® Cookbook, in the chapter titled miRNA Analysis.
miRNA Analysis Made Easy
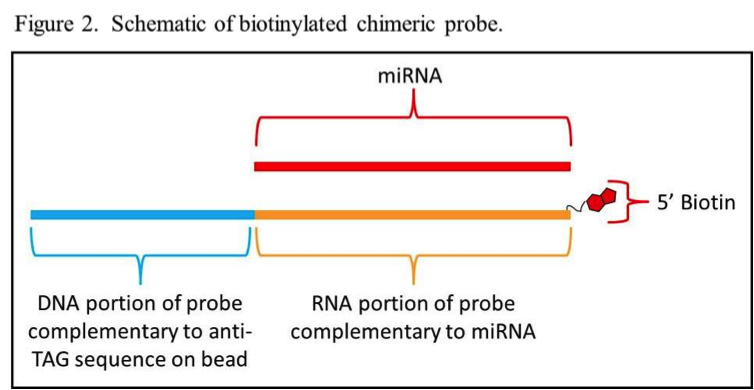
Key to developing an effective Luminex-based miRNA assay is the design of the biotinylated chimeric probes. The probes consist of a DNA segment on the 3’ end and an RNA 5’ portion complementary to a miRNA target with a biotin molecule on the 5’ end (Figure 2). The DNA segment of each probe is complementary to one of the 24 base anti-TAG sequences that are already coupled to one of Luminex’s MagPlex®-TAG™ bead sets. Using MagPlex-TAG beads eliminates the extra time and expense spent on optimizing the coupling of capture oligonucleotides to the beads. The user just needs to design chimeric probes with suitable TAG sequences in the DNA portion and purchase the appropriate MagPlex-TAG beads from Luminex.
To simplify the probe design process, an Excel-based miRNA probe design tool is available for download here: miRNA Chimeric Probe Design Tool.
This tool will automatically assemble probe sequences in a near ready to order format. Of the 13 tabs in the file, the user only needs to use four of these tabs. These are:
- RNA Sequences
- TAG Sequences
- anti-TAGs on Beads, and
- Final Designed Probe
The user should not alter the contents of the other nine tabs. If the contents of any of the other 13 tabs are altered the user should download a new copy of the tool.
Using the miRNA Chimeric Probe Design Tool
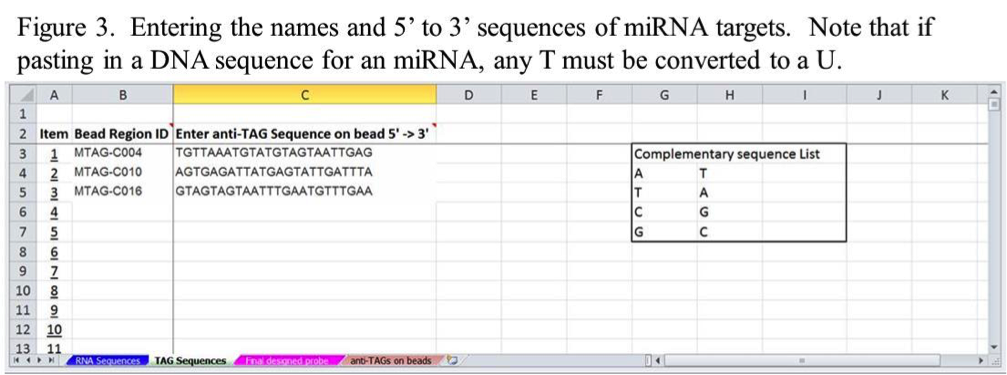
To use the tool, the first step is to enter the desired name of each miRNA and its 5’ to 3’ sequence on the RNA Sequences tab as shown in Figure 3. These can be typed in or copied and pasted from other files. When entering more than one miRNA sequence, start on the Item 1 row and continue down sequentially without skipping rows.
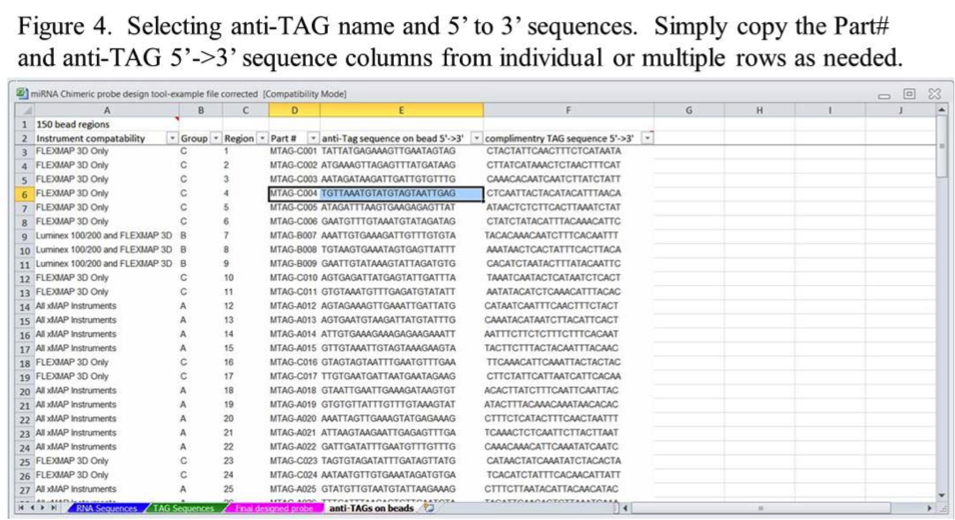
The next step is to select the desired anti-TAG sequences from the anti-TAGs on Beads tab for each miRNA. This can be done by copying the information for individual or multiple bead regions from columns D and E (Figure 4).
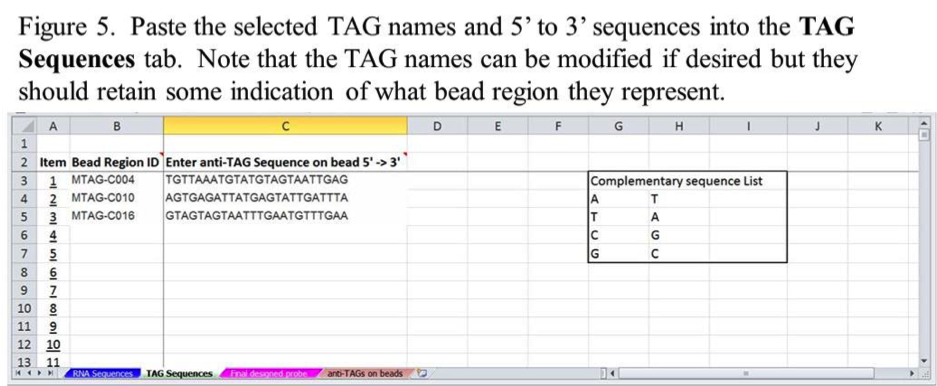
The copied part number and anti-TAG sequences can be pasted into columns B and C on the xTAG Sequences tab in an Item row corresponding to a specific miRNA from the RNA Sequences tab (Figure 5). Use the Item columns on the RNA Sequences and TAG Sequences tabs to keep track of the order of miRNA-TAG matched pairs.
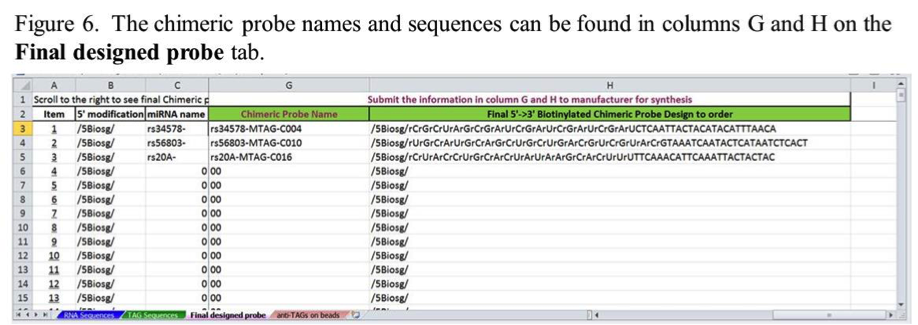
Once the miRNA and anti-TAG information is entered, the chimeric probes are automatically generated and displayed on the Final Designed Probe tab. The probe names and probe sequences will be in columns G and H on this tab (Figure 6). The probe name will be generated from a concatemer of the miRNA and TAG names entered on the RNA Sequences and TAG Sequences tabs respectively. The probe sequences will show 5’ biotinylation and indicate which bases should be RNA and which are DNA. These names and sequences may be suitable for ordering these probes from some oligo nucleotide manufacturers. Check with your manufacturer’s ordering instructions to make sure the notation meets their requirements.
Note that to see the probe names and sequences in columns G and H on the Final Designed Probe tab, you may need to use the scroll bar at the bottem right of the spreadsheet to scroll over to this information.
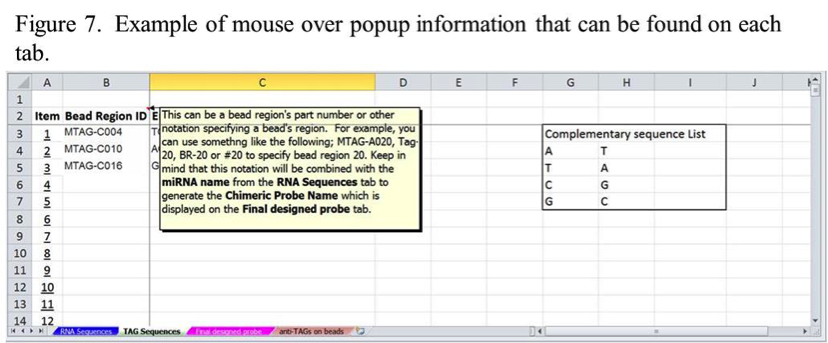
If you are not sure how to enter information, each tab has mouse over popup instructions for different fields, as shown in Figure 7. Use these if you are not sure how to enter information. You can also contact Technical Support or your FAS for guidance on how to use the design tool.
